

Hello,
I hope everyone is having a good weekend so far. A few days ago, a friend of my mother proposed I make a breast cancer awareness bracelet. Therefore, today I decided that I would make it my project for the day. After a quick web search, I came across a breast cancer bracelet pattern on BraceletBook.com.
Now to make this bracelet, you will need:
♥ 6 pink strands of embroidery floss
♥ 2 white strands of embroidery floss
You can find embroidery floss for a reasonable price on Amazon.
Now to make this bracelet, you will need:
♥ 6 pink strands of embroidery floss
♥ 2 white strands of embroidery floss
You can find embroidery floss for a reasonable price on Amazon.
The length of the thread depends on how long you would like your bracelet. I use the length of my arm (from wrist to shoulder) for each strand. The ends can either be braided, or braided on one end and a loop on the top, or you can purchase clamps, a chain and a clasp for a more clean look. Here I decided on the loop end. You can just fold the strings in half and tie a knot OR again for a more clean look you can knot the top {more about the knotted top later, however if you would like to do it now here is the link to the tutorial on braceletbook.com. Here is the pattern if you would like to make your own bracelet:
.jpg) |
| Image belongs to braceletbook.com The pattern number for this bracelet is #1619 |
I have not yet completed the bracelet, however this is what it looks like so far:
.jpg)
.jpg)
Now this pattern is little tricky because it has four different knots in it.
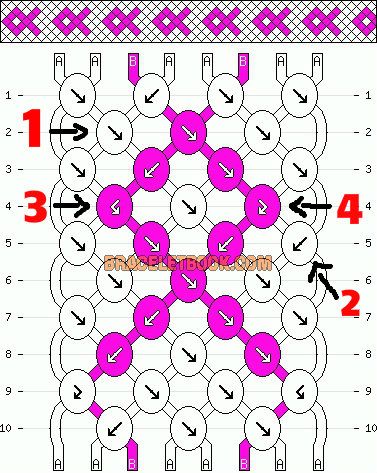
Therefore, below is the knot tutorial so that you can see how each knot is made.
 |
| Image belongs to BraceletBook |
I realize that friendship bracelet patterns can look scary if you are not used to them. Therefore, I wanted to show you a video I found on YouTube from Beyond Bracelets. Beyond Bracelets has many various bracelet tutorial videos. I learned so much from her videos. They are very well made videos. Below is the Breast cancer awareness (or any awareness ribbon if you change the color) tutorial video. Take a look!
Once you have completed the bracelet, this is what it should look like!

So that is all for today. I hope that you were able to learn and understand how to create this pattern.
Good luck!Let me know how your bracelet comes out. I would love to see pictures or hear your thoughts.
Happy Crafting,
Disclosure: This post contains affiliate links. I receive a small commission when you make a purchase through these links. There is no cost to you.


This comment has been removed by the author.
ReplyDelete